How to Use Apex:enhancedList tag in Visualforce Page?
Enhanced list views on a Visualforce page
Enhanced lists are used when you want to display a specific list view for a standard or custom object, rather than having all list views available for the user to select.
This tag supports following attributes.
Attribute Name
|
Description
| ||
customizable
|
A Boolean value that specifies whether the list can be customized by the current user. If not specified, the default value is true. If this attribute is set to false, the current user will not be able to edit the list definition or change the list name, filter criteria, columns displayed, column order, or visibility. However, the current user's personal preferences can still be set, such as column width or sort order.
| ||
height
|
| ||
id
|
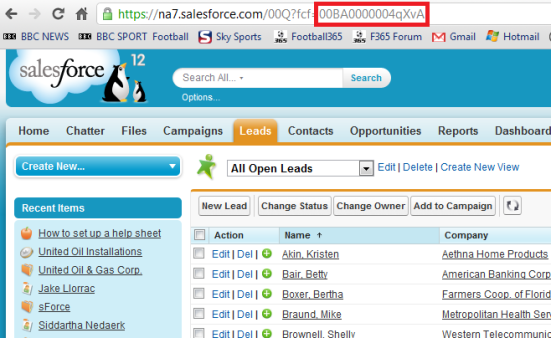
The database ID of the desired list view. When editing a list view definition, this ID is the 15-character string after 'fcf=' in the browser's address bar. This value is required if type is not specified.
| ||
listId
|
The Salesforce object for which views are displayed. This value is required if type is not specified.
| ||
oncomplete
|
The JavaScript that runs after the page is refreshed in the browser. Note that refreshing the page automatically calls this JavaScript, while an inline edit and subsequent save does not.
| ||
rendered
|
A Boolean value that specifies whether the component is rendered on the page. If not specified, this value defaults to true.
| ||
reRender
|
The ID of one or more components that are redrawn when the result of an AJAX update request returns to the client. This value can be a single ID, a comma-separated list of IDs, or a merge field expression for a list or collection of IDs. Note: When an enhancedList is rerendered through another component's rerender attribute, the enhanceList must be inside of an apex:outputPanel component that has layout attribute set to "block".
| ||
rowsPerPage
|
An integer value that specifies the number of rows per page. The default value is the preference of the current user. Possible values are 10, 25, 50, 100, 200. Note: If you set the value for greater than 100, a message is automatically displayed to the user, warning of the potential for performance degradation.
| ||
type
|
The Salesforce object for which views are displayed, for example, type="Account" or type="My_Custom_Object__c".
| ||
width
|
An integer value that specifies the width of the list in pixels. The default value is the available page width, or the width of the browser if the list is not displayed in the initially viewable area of the viewport.
|
Step 1 – Create the list view
Go to the standard or custom object and click on the Create New View next to the Go button. Create the view and click on Save. When the page has reloaded, you will notice in the url a 15 digit id has been created for your view. Copy or make a note of the id.
Step 2 – Add code to your visualforce page
Add the following bit of code to your visualforce page, replacing the listid with your id:
<apex:enhancedlist type=”Lead” height=”730″ customizable=”false” rowsPerPage=”25″ Listid=”00B30000007wesH” />
Change customizable to equal true if you want your users to be able to edit the filters on the view. Once saved, you should find your visualforce page displays an enhanced list similar in appearance to the image below.


No comments:
Post a Comment