anusha(salesforce developer)

Tuesday, 30 August 2016

How To Create Dynamic Dependent Picklist Of Objects Within Salesforce

Another question has been asked to our Salesforce developers so we thought best to share it with the Salesforce development world. Dependent picklist is very useful within the Salesforce CRM for many reasons.  It is used to limit the list of values in one picklist based on the value of another picklist.
An example would be if you had a list of continents, countries, states, regions and major cities.  If you select a Continent as an example, you would want the country to be filtered in the next picklist within Salesforce.  The country selected should then limit the states that would be available for selection and so on.
Displaying dependent picklists is very simple with a Visualforce page. Let’s assume that we have custom objects called continents, country, state, region and major cities. These are all the objects that are related to each other by the Lookup field within Salesforce.
In this simple example we are going to make 5 different objects within Salesforce. These will be continents, country, state, region and major cities. We will create 4 lookup fields as well. The first lookup field in country will be linked with continent, the second lookup field is state and is linked with country. The third lookup field is region and is linked with state and so on.
If you follow these simple steps within Salesforce, you can create a dynamic dependent picklist:
sample Image
Step 1 -
Go To Setup a Develop a Apex Classes
Click the “New” button for creating new Apex class:
Copy this code and paste it in your editor
public class MultilevelDependentPicklist {public string conti{get; set;}
public string contr{get; set;}
public string stat{get; set;}
public string regi{get; set;}
public string city{get; set;}
public MultilevelDependentPicklist(ApexPages.StandardController controller) { }
public list<selectoption> getcontinentobj(){list<selectoption> options= new list<selectoption>();
list<Continent__c> conti= [select name from Continent__c order by name];
options.add(new selectoption(‘—-Select Anyone—-‘, ‘—-Select Anyone—-‘));
for(Continent__c c:conti){options.add(new selectoption(c.name,c.name));
}
return options;
}
public list<selectoption> getcontryobj(){
list<selectoption> options= new list<selectoption>();
list<Country__c> contr= [select name  from Country__c where Continent__r.name=:conti];
options.add(new selectoption(‘—-Select Continent—-‘, ‘—-Select Continent—-‘));
for( Country__c c:contr){
options.add(new selectoption(c.name,c.name));
}
return options;
}
public list<selectoption> getstateobj(){
list<selectoption> options= new list<selectoption>();
list<State_Provice__c> stat= [select name from State_Provice__c where Country__r.name=:contr];
options.add(new selectoption(‘—-Select Country—-‘, ‘—-Select Country—-‘));
for(State_Provice__c s:stat){
options.add(new selectoption(s.name,s.name));
}
return options;
}
public list<selectoption> getregionobj(){
list<selectoption> options= new list<selectoption>();
list<County_Region__c> regi= [select name from County_Region__c  where State_Provice__r.name=:stat];
options.add(new selectoption(‘—-Select State—-‘, ‘—-Select State—-‘));
for(County_Region__c r:regi){
options.add(new selectoption(r.name,r.name));
}
return options;
}
public list<selectoption> getcityobj(){
list<selectoption> options= new list<selectoption>();
list<City__c> city= [select name from City__c where County_Region__r.name=:regi];
options.add(new selectoption(‘—-Select Region—-‘, ‘—-Select Region—-‘));
for(City__c c:city){
options.add(new selectoption(c.name,c.name));
}
return options;
}
}

Step 2 -
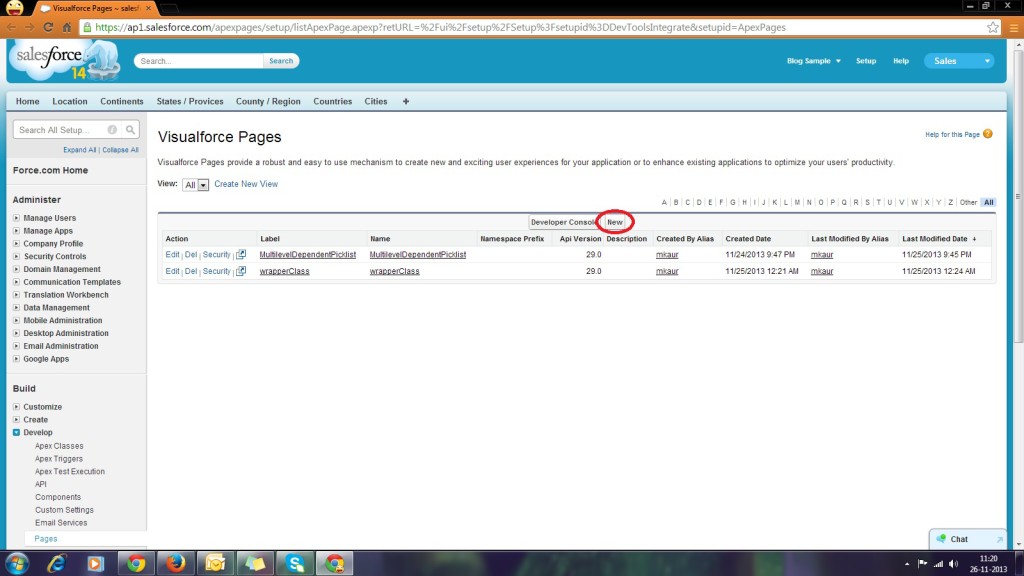
Go To Setup a Develop a Pages
Click the “New” button for creating new Visualforce pages within Salesforce
image3
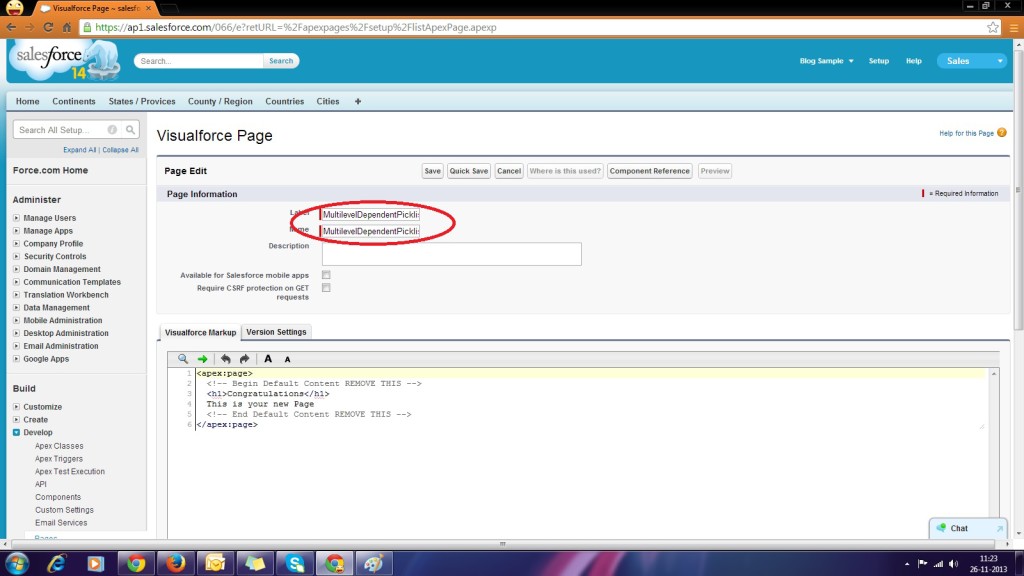
Step 3 -
In the label and name box type “Multi-level Dependent Picklist” within Salesforce
image4
Step 4 –
In the Visualforce page editor paste this following code:
<apex:page standardController=”Continent__c” extensions=”MultilevelDependentPicklist”>
<apex:sectionHeader title=”Find your location” subtitle=”{!Continent__c.name}”/>
<apex:form >
<apex:pageBlock title=”Location” mode=”edit”>
<apex:pageBlockSection columns=”1″>
<apex:pageblockSectionItem >
<apex:outputLabel value=”Continent Name”/>
<apex:outputPanel styleClass=”requiredInput” layout=”block”>
<apex:outputPanel styleClass=”requiredBlock” layout=”block”/>
<apex:selectList size=”1″ value=”{!conti}”>
<apex:selectoptions value=”{!continentobj}”/>
<apex:actionSupport event=”onchange” reRender=”country”/>
</apex:selectList>
</apex:outputPanel>
</apex:pageblockSectionItem>
<apex:pageblockSectionItem >
<apex:outputLabel value=”Country Name”/>
<apex:selectList size=”1″ value=”{!contr}” id=”country”>
<apex:selectoptions value=”{!contryobj}”/>
<apex:actionSupport event=”onchange” reRender=”states”/>
</apex:selectList>
</apex:pageblockSectionItem>
<apex:pageblockSectionItem >
<apex:outputLabel value=”State / Provice”/>
<apex:selectList size=”1″ value=”{!stat}” id=”states”>
<apex:selectoptions value=”{!stateobj}”/>
<apex:actionSupport event=”onchange” reRender=”regions”/>
</apex:selectList>
</apex:pageblockSectionItem>
<apex:pageblockSectionItem >
<apex:outputLabel value=”County / Region”/>
<apex:selectList size=”1″ value=”{!regi}” id=”regions”>
<apex:selectoptions value=”{!regionobj}”/>
<apex:actionSupport event=”onchange” reRender=”cities”/>
</apex:selectList>
</apex:pageblockSectionItem>
<apex:pageblockSectionItem >
<apex:outputLabel value=”City”/>
<apex:selectList size=”1″ value=”{!city}” id=”cities”>
<apex:selectoptions value=”{!cityobj}”/>
<apex:actionSupport event=”onchange” reRender=”village”/>
</apex:selectList>
</apex:pageblockSectionItem>
</apex:pageBlockSection>
</apex:pageBlock>
</apex:form>
</apex:page>
“Save” this code.
Step 5-
Check it and make sure it’s working correctly. Enjoy!

Monday, 29 August 2016

Apex Code Best Practices

Apex Code Best Practices

1: Bulkify your Code
2: Avoid SOQL Queries or DML statements inside FOR Loops
3: Bulkify your Helper Methods
4: Using Collections, Streamlining Queries, and Efficient For Loops
5: Streamlining Multiple Triggers on the Same Object
6: Querying Large Data Sets
7: Use of the Limits Apex Methods to Avoid Hitting Governor Limits
8: Use @future Appropriately
9: Writing Test Methods to Verify Large Datasets
10: Avoid Hardcoding IDs

Sunday, 28 August 2016

Triggers Best Practices in Salesforce

1. Future methods, SOQL and DML:

    Avoid writing Future methods, SOQL and DML inside the "For" loop.

2. Bulkify the trigger:

    Start developing the logic for bulk of records getting inserted or updated or deleted. Trigger will be invoked when we insert bulk of records from any data loading tools or through Web services. So, we should not concentrate on 1 record, we have to concentrate on bulk of records.

3. Larger sets of records:

    Use SOQL in For loop, to avoid 50001 limit error.

Account[] accts = [SELECT id FROM account];

Exception will be thrown, if there are more than 50000 records.

for (List<Account> acct : [SELECT id, name FROM account WHERE name LIKE 'Test']) {

    // Your logic here

    update acct;
}

The Force.com platform chunk your large query results into batches of 200 records by using this syntax where the SOQL query is in the for loop definition, and then handle the individual datasets in the for loop logic.

4. Make use of the Limits Apex Methods to check whether we are nearing Governor Limits.

Number of SOQL Queries allowed in this Apex code context - Limits.getLimitQueries()

Number of records that can be queried  in this Apex code context - Limits.getLimitDmlRows()

Number of DML statements allowed in this Apex code context - Limits.getLimitDmlStatements()

Number of CPU usage time (in ms) allowed in this Apex code context - Limits.getLimitCpuTime()

5. Never hardcode SFDC record ids.

Best Practices while writing Test Classes ?

Best Practices while writing Test Classes ?
  1. Test Coverage Target Should not be limited to 75%”. It is not about coverage, It is about testing complete functionality
  2. If possible Don’t use seeAllData=true, Create your Own Test Data.
  3. Always use @testSetup method dedicated to create test records for that class. This is newly added annotation and very powerful. Any record created in this method will be available to all test methods of that class. Using @testSetup method will improve test execution performance by creating test records only once for that class. If you are not using this, means test record is created in each TestMethod which will be very slow.
  4. Create Different Class which will create Dummy Data for testing, and use it everywhere 
  5. Use Test.startTest() to reset Governor limits in Test methods
  6. Use As much as Assertions like System.AssertEquals or System.AssertNotEquals
  7. If you are doing any Asynchronous operation in code, then don’t forget to call Test.stopTest() to make sure that operation is completed.
  8. Use System.runAs() method to enforce OWD and Profile related testings. This is very important from Security point of View.
  9. Always test Batch Capabilities of your code by passing 20 to 100 records.
  10. Use Test.isRunningTest() in your code to identify that context of class is Test or not. You can use this condition with OR (||) to allow test classes to enter inside code bock. It is very handy while testing for webservices, we can generate fake response easily.
  11. @TestVisible annotation can be used to access private members and methods inside Test Class. Now we don’t need to compromise with access specifiers for sake of code coverage.
  12. End your test class with “_Test”. So that in Apex Class list view, Main class and Test class will come together, resulting easy navigation and time saver.
  13. Always try to pass null values in every methods. This is the area where most of program fails, unknowingly.

Tuesday, 23 August 2016

how many batch jobs in queue in salesforce? (Force.com Spring '15 Release Apex Flex Queue)

Force.com Spring '15 Release
Apex Flex Queue


Submit up to 100 batch jobs simultaneously and actively manage the order of the queued jobs to control which batch jobs are processed first. This enhancement provides you more flexibility in managing your batch jobs.
Note: For all new organizations in Spring ’15, Apex Flex Queue is enabled by default. To enable Apex Flex Queue in an existing organization, activate the Apex Flex Queue critical update in Setup. This critical update doesn’t affect the behavior of existing Apex code that adds batch jobs to the queue for execution. The Holding status has been added for batch jobs, which might affect queries against AsyncApexJob. See “Critical Updates Overview” in the Salesforce Help for more details about critical updates.
Previously, you could submit only up to five batch jobs simultaneously. The Apex flex queue enables you to submit up to 100 batch jobs for execution. Any jobs that are submitted for execution are in holding status and are placed in the Apex flex queue. Up to 100 batch jobs can be in the holding status. When system resources become available, the system picks up jobs from the top of the Apex flex queue and moves them to the batch job queue. The system can process up to five queued or active jobs simultaneously. The status of these moved jobs changes from Holding to Queued. Queued jobs get executed when the system is ready to process new jobs.
Without administrator intervention, jobs are processed first-in first-out—in the order in which they’re submitted. Administrators can modify the order of jobs that are held in the Apex flex queue to control when they get processed by the system. For example, administrators can move a batch job up to the first position in the holding queue so that it’s the first job that gets processed when the system fetches the next held job from the flex queue. To monitor and reorder held batch jobs in the Salesforce user interface, from Setup click Jobs > Apex Flex Queue.

Submitting Jobs by Calling Database.executeBatch

When you submit batch jobs by calling Database.executeBatch, the system places your batch job in Holding status before processing the job.
The outcome of Database.executeBatch is as follows.
  • The batch job is placed in the Apex flex queue, and its status is set to Holding as long as the number of jobs in the flex queue hasn’t reached the maximum of 100.
  • If the Apex flex queue has the maximum number of jobs, Database.executeBatch throws a LimitException and doesn’t add the job to the queue.

When system resources become available, the system picks up the next job from the top of the flex queue for processing and changes its status to Queued.

New AsyncApexJob Status Field

The AsyncApexJob object, which represents a batch job, has a new Status field value of Holding. This new status indicates that the job is placed in the flex queue and is waiting to be processed when system resources become available.

Chain More Jobs with Queueable Apex

Queueable Apex was introduced in Winter ’15 and enables you to easily start and manage asynchronous processes. Previously, you could chain a queueable job to another job only once due to a limit. This limit has now been removed and you can chain an unlimited number of jobs in all Salesforce editions except Developer Edition. For Developer Edition organizations, the chained job limit has been raised to five chained jobs.
Chaining jobs is useful when you need to run a job after some other processing is done. To chain a job to another job, submit the second
job from the execute() method of your Queueable class. For example, if you have a second class that’s called SecondJob that
implements the Queueable interface, you can add this class to the queue in the execute() method as follows:
public class AsyncExecutionExample implements Queueable {
  public void execute(QueueableContext context) {
  // Your processing logic here
  // Chain this job to next job by submitting the next job
  System.enqueueJob(new SecondJob());
  }
  }
Only one child job can be started for each parent job in the chain, but the depth of the chain is unlimited for non-Developer Edition
organizations.

Processing Chained Jobs

When you chain one job to another job in the same transaction, a delay is added before the system processes the next child job. This delay starts with 1 second for the second submitted job and increases exponentially for subsequent jobs in the queue. For example, the third job has a delay of 2 seconds, the fourth job has a delay of 4 seconds, and so on, up to 64 seconds maximum delay. The delay is 2 to the nth power (2n), where n is the order of the next submitted child job starting from zero. After the eighth job, the delay stays constant at 64 seconds (26).
This delay applies only to queueable jobs that have been chained together, not to queueable jobs that were submitted from the same Queueable class. For example, if you submit three jobs by calling System.enqueueJob from the same Queueable class, these jobs are queued for execution and are processed independently without the additional delay.
String Methods Fixed for Escaping Additional Characters
When you activate this update, these Apex String methods will escape additional characters: escapeHtml3, escapeHtml4, and escapeEcmaScript.
Currently, these String methods don’t escape certain characters. When you activate this update, these methods will escape the following additional characters.
  • escapeHtml3: ' (single quote)
  • escapeHtml4: ' (single quote)
  • escapeEcmaScript: < (opening angle bracket) and > (closing angle bracket)
This update changes the behavior of the affected String class methods for all API versions.

Scheduled Apex Job Delay for Chained Jobs

This critical update adds a five-minute delay for new scheduled Apex jobs that are started from an asynchronous execution context, such as from batch Apex.
After you apply this update, the system activates the scheduled jobs that are started from an asynchronous execution context after the time delay has passed. Scheduled jobs whose start time is within the first five minutes after the job is created won’t run until the fire time that occurs after the delay, after which they continue to run at the specified interval.
This update minimizes the system-wide impact of Apex jobs that are chained together with scheduled Apex. Use the Queueable interface to chain Apex jobs, or if your process requires batch processing, call Database.executeBatch in the finish method of batch jobs.
The delay that this update adds doesn’t affect scheduled Apex jobs that are set up in the Salesforce user interface or started in a synchronous context.

Monday, 22 August 2016

Salesforce SOQL query LAST_WEEK ; LAST_N_DAYS:n ; N_DAYS_AGO:n

Salesforce SOQL query LAST_WEEK ; LAST_N_DAYS:n ; N_DAYS_AGO:n


LAST_WEEK
Using criteria LAST_WEEK in SOQL will return all records where the date starts from 12:00:00 AM (user Local Time Zone) on the first day of the week before the most recent first day of the week and continues for seven full days. First day of the week is determined by your locale.
Example: my user locale setting is English (United States) and today = Sat, 23 Nov 2013, I run query below:
SELECT Id, Name, CreatedDate FROM Account WHERE CreatedDate = LAST_WEEK ORDER BY CreatedDate DESC
this query will return accounts created between 10-16 Nov 2013, because for Locale is US English, a week runs Sunday to Saturday, whereas with UK English, a week spans Monday to Sunday.

SELECT Id, Name, CreatedDate FROM Account WHERE CreatedDate < LAST_WEEK ORDER BY CreatedDate DESC
this query will return accounts created before 10 Nov 2013.

LAST_N_DAYS:7
Using LAST_N_DAYS:7 in SOQL will return all records where the date starts from 12:00:00 AM (user Local Time Zone) of the current day and continues for the last 7 days.
SELECT Id, Name, CreatedDate FROM Account WHERE CreatedDate = LAST_N_DAYS:7 ORDER BY CreatedDate DESC
If today is Friday, 22 Nov 2013, using LAST_N_DAYS:7 will return account created between 16 - 22 Nov 2013, while LAST_WEEK will return account created between 10 - 16 Nov 2013.

N_DAYS_AGO:7
Using N_DAYS_AGO:7 in SOQL will return all records where the date starts from 12:00:00 AM (user Local Time Zone) on the day 7 days before the current day and continues for 24 hours. (The range does not include today.)
SELECT Id, Name, CreatedDate FROM Account WHERE CreatedDate = N_DAYS_AGO:7 ORDER BY CreatedDate DESC
If today is Monday, 25 Nov 2013, using N_DAYS_AGO:7 will return account only created on 18 Nov 2013. 

Please note all Date field return in SOQL query will be in GMT format, example: 2013-11-18T08:05:21.000Z, so you need to convert it as needed.

Using Permission Set to Query User Permission

Permission Set is powerful feature in Salesforce, if you are using Enterprise and Unlimited edition (included Developer edition). Using permission set, admin can assign additional permissions to users on top of permission given in Profile assign to that user. Permission Set is set per user basis and is only to ADD more permissions, not to reduce it from Profile. Permission Set also may given to admin users when the permission cannot be enabled in standard System Administrator profile.

Permission Sets include settings for:
- Assigned Apps
- Assigned Connected Apps
- Object Settings, which include: objects, fields, and tab availability
- App Permissions
- Apex Class Access
- Visualforce Page Access
- External Data Source Access
- Named Credential Access
- Data Category Visibility
- Custom Permissions
- System Permissions
- Service Providers

In this blog, I am not going to explain how to setup Permission Set, you can find the overview here.

As of now, we still cannot run report on Permission Set and Users assignment to Permission Set. But, since Summer '11 release (API version 22), Salesforce introduce 2 new objects related to this: PermissionSet andPermissionSetAssignment. To make this object more powerful, in Spring '12 release (API version 24),FieldPermissions and ObjectPermissions object are introduced with ParentId which pointing to PermissionSet.

Once you understand the architecture, you can answer all sorts of questions about your users and permission. Here is the diagram (right click image to see in full size) :


Here are few samples using SOQL to query permission set:

List all Permission Set
SELECT Id, Name FROM PermissionSet WHERE IsOwnedByProfile = False ORDER BY Name

List all Permission Set not from Managed Package
SELECT Id, Name FROM PermissionSet WHERE IsOwnedByProfile = False AND NamespacePrefix = '' ORDER BY Name


Show all Users with ViewAllData Permission
SELECT Id, AssigneeId, Assignee.Name, PermissionSet.IsOwnedByProfile
FROM PermissionSetAssignment
WHERE PermissionSet.PermissionsViewAllData = True
ORDER BY PermissionSet.IsOwnedByProfile DESC, Assignee.Name

This query will return all Users with Permission to View All Data, either acquired from Profile or from Permission Set.


Compare to query below, where it just return the permission from Profile only.

SELECT Id, Name
FROM User
WHERE ProfileId IN  (SELECT Id
                    FROM Profile
                    WHERE PermissionsViewAllData = true)
ORDER BY Name


Show all Users by specific Profile and return Permission Set assigned to that user
SELECT p.Id, p.Assignee.Name, p.Assignee.Profile.Name, p.PermissionSet.Label
FROM PermissionSetAssignment p
WHERE p.PermissionSet.IsOwnedByProfile = False AND p.Assignee.Profile.Name = 'Sales Reps'
ORDER BY p.PermissionSet.Label, p.Assignee.Name

This query will return all Users with Permission Set assigned to users with Profile = Sales Reps and the additional Permission Set name assigned.


Show all User have read access to Account and which permission give the access:
SELECT Assignee.Name, PermissionSet.isOwnedByProfile, PermissionSet.Profile.Name, PermissionSet.Label
FROM PermissionSetAssignment
WHERE PermissionSetId
IN (SELECT ParentId FROM ObjectPermissions WHERE SObjectType = 'Account' AND PermissionsRead = True)
AND Assignee.Name = 'Johan Yu'
ORDER BY PermissionSet.Profile.Name, PermissionSet.Label

This query will return Permission Set (and Profile if exist) that give the users read access to Account object.


Show permission a user has for Account and which permissions give that access:
SELECT Id, SObjectType, Parent.Label, Parent.IsOwnedByProfile, PermissionsRead, PermissionsCreate, PermissionsEdit, PermissionsDelete, PermissionsViewAllRecords, PermissionsModifyAllRecords
FROM ObjectPermissions
WHERE (ParentId IN (SELECT PermissionSetId FROM PermissionSetAssignment WHERE Assignee.Name = 'Johan Yu'))
AND (SobjectType = 'Account')
ORDER BY Parent.IsOwnedByProfile DESC, Parent.Label


This query will return user permission of an object and also tell all Permission Set (and Profile if exist) that give the user that permissions.


Mass Assign Permission Sets to Users
Based on PermissionSetAssignment attributes, we can use Data Loader to mass assign (and mass delete) users with specific Permission Set. All you need to provide just: AssigneeId (which is User Id) and PermissionSetId. But, you cannot update record in PermissionSetAssignment.